

By Greg Wagner
One would think in this age of digital cameras and editing capabilities it would be pretty easy for hunters to get a good quality photo with their harvested deer. But, think again. Whether it is the excitement of the moment or the rush to get the animal field dressed, many hunters just flat out fail to successfully capture the cool hunting images of the day, and that’s a shame.
The opportunity is there, though, for you to properly document the moment with your deer for all your friends and family members to see and share online.
With a little prep work and attention to detail, you can ensure this historic occasion is respected, highlighted and preserved with a high-quality deer harvest photo.
Tips for taking quality photos
So, what denotes a high-quality photo with your deer?
Award-winning Nebraskaland Magazine photographer/writer Eric Fowler and I offer these tips on how to take the best photo with your harvested deer.
Get photos after cancelling your tag, but before field dressing. Cancel your tag/permit immediately after making certain the animal is deceased. Then, take your photos before field dressing it and checking it. Doing otherwise often results in a bloody mess that detracts from the photo.
Show the habitat you hunted, the clothing you wore during the hunt and the firearm or bow used (if desired). Find a suitable spot that is the essence of the terrain and habitat you hunted, but don’t let the cover obscure your photo. If possible, have a contrasting background from the antlers of your buck to make them pop! Also, accurately document the memory of the hunting experience by making certain you are wearing the clothing you had donned when you harvested the animal. The firearm or bow used to harvest the animal can be included in the picture, provided it is done so safely and ethically. When setting up for a deer harvest photo to include a firearm, be sure that it is unloaded, keep the action open and its muzzle always pointed in a safe direction. The firearm or bow, especially if it is an heirloom or was handcrafted, may help to tell the story of the hunt and give the photos a more complete look and feel.
Clear out the clutter. It is crucial to remove all debris and clutter around you, the deer and in the frame before shooting pics. Pull grass, weeds and stalks in front of you and the deer. Remove objects that look weird or appear out of place in the shot. A hunter’s backpack would be an example. Check your background. Be sure there are no distractions.
Forget the pickup truck bed shots, please. Yes, in the past, I have been guilty of taking these cruddy photos! But seriously, I have learned to never pose with a harvested deer in a pickup truck bed. It’s lazy, sloppy, and tasteless, and doesn’t honor an esteemed game animal. Do you really want to photograph that beautiful deer in a dirty pickup bed with crushed aluminum cans, fast-food sacks, cigarette butts and an old wooden board or two laying around it? Look, even photographing a harvested deer in your yard is better.
Scrap the garage pic, as well. Also despised by ethical hunters and others are inconsiderate photos taken of harvested deer in garages or storage sheds. Typically, these field-dressed carcasses hang by the back legs from the rafters with the head positioned just above a 5-gallon bucket. Garage deer are often photographed with shelves of old cardboard boxes, cans of motor oil, jugs of anti-freeze, automotive parts and the like serving as a backdrop.
No smoking! Do not smoke when taking photos with your harvested deer. This is a matter of etiquette and presenting the hunting experience in a manner that honors the animal and the tradition. Also, the smoke will add an unnatural and a strong scent to your clothing and the environment around you that can inevitably spook other deer from coming into your hunting area. By the way, smoking isn’t healthy for you anyway, is it?
Clean the animal, yourself and the hunter! Carry several moist wipes in a sealable plastic bag. Use those to clean the blood from the deer’s mouth and nose if present. Remove dirt, leaves, grass, weeds, crop stubble, blood and saliva from yourself — the hunter and the deer. Wipe off any blood splatter on the animal or antlers. Face any large exit wounds on the deer away from the camera.
No tongue. Show the highest regard for a harvested deer by putting the animal’s tongue back in its mouth.
Antlers are not a gun rack. Do not rest your gun or bow on the deer’s antlers. It is disrespectful to the animal.
Think about folding the legs under. Some hunters like to prop up the deer as if it was in a bedded position. This action can be done by folding a deer’s legs underneath its body. The pose is very visually appealing and will actually make the deer look somewhat larger than if it was lying on its side. If the back legs get too stiff, leave them straight out. If you can, put the deer on its stomach so it’s upright.
Be next to your deer — go low, no straddling — and smile. Some hunters like to stand an arm’s length behind the animal to make the antlers look bigger. This does not fool anyone and only makes the hunter look smaller. Shoot photos from a low angle so you are even with or below the animal. Don’t straddle the deer either. It is not a horse. Display reverence for the deer by kneeling or sitting beside it or behind it, put a calm hand on it and smile. And, one other thing: Grasp the antlers of a buck near the bases with your fingertips if you can so as not to cover them up.
Note the angle of the sun. When setting up the photo, your top option is to position the sun over the shoulder of the photographer. An exception is at sunset, when you can use a colorful sky as a background and use the camera’s flash to illuminate the hunter.
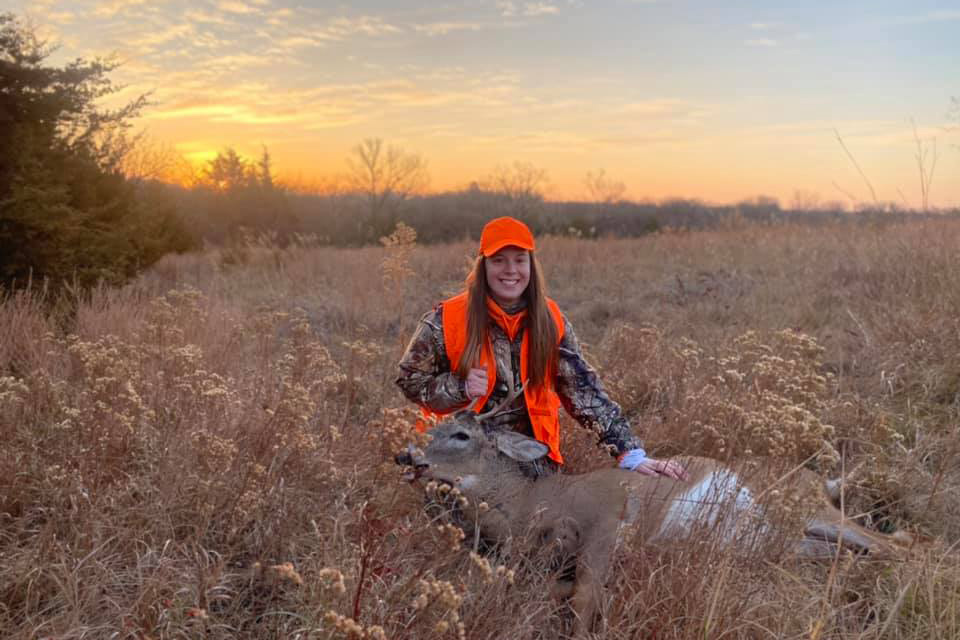
Utilize the softest light. Take your pictures early and late in the day when the light tends to be at its softest. From late morning to late afternoon, avoid direct sunlight. Cloudy days work really well. Pose in full shade, if possible, and use a flash.
Pass on the photos at night, if possible. If you recover a deer after dark and can keep it cool enough to preserve the meat, wait until the next morning to shoot photos. You’ll benefit from more light and morning dew or frost can really add beautiful elements to the so-called “hero shot,” in which the jubilant hunter poses with their acquired game. If the photo needs to be taken in the darkness, take extra care with the deer to get an acceptable pic and use any natural light from the western horizon that remains available.
Taking a good “selfie” while hunting solo. Are you deer hunting alone? Don’t think you can take a decent pic with your deer? Look, every smartphone has a camera with a self-timer. Learn how to use it and practice with it. In the field, in the absence of a tripod, prop your phone up against a tree, on a log or rock, or perhaps on top of your backpack making certain it is framed appropriately around you and your deer. Set the timer and get into the picture. You have plenty of time so use that time to take as many pics as you need to get a good shot.
Use fill flash or tip up the hat. A fill flash will open the shadow cast on a hunter’s face by his hat. If your camera doesn’t have a flash, have the hunter tip up their hat.
Skip the tight focus, frame it. Leave plenty of space around the subjects when it comes to snapping photos of a hunter and their big game animal. Start with wide shots. Properly frame the image. Don’t chop off any part of the hunter or the deer unless you want to somewhat discreetly hide a brand logo on clothing. Don’t let antler tines obscure or block the face of the hunter either. Keep in mind you can crop the image later, if need be.
Shoot lots of and different pics. Horizontal photos can include the front half of the deer’s body or the entire deer’s body and surrounding landscape. Verticals can zoom in on the deer’s head and/or shoulders. Rigor mortis happens fast, so loosen up the deer’s neck muscles a bit. Then try different angles and levels. Be creative! Reenact scenarios like dragging a buck, walking up on the deer, etc. Situate your hunter and their deer to have the viewer’s eyes go from left to right to make a more visually appealing photo. Perhaps you’ll even get a close shot of a buck’s antler base during the rut with tree rub residue? The goal is to be innovative and snap a variety of photos!
Use image-editing apps, tools and software. Most camera applications now have features that allow you to adjust the colors and effects on a picture, and there are a ton of wonderful apps out there that can take your photos to the next level with special effects and filters. Maybe you will utilize image-editing software such as Photoshop.
What about video? Taking proper deer hunting and harvest videos requires balancing the demands of filming with legal, ethical hunting practices and effective storytelling. Key tips include using a stable camera setup, capturing the entire story of the hunt, ensuring good audio, and presenting the harvest respectfully and without graphic impact shots which show the moment a projectile (like an arrow or bullet) strikes an animal during a hunt. Filming a hunt is about so much more than just getting a kill shot on video.
Remember, the best deer harvest photos or video taken can make any hunter proud. All it takes is a bit more time, effort and creativity to give that animal the ultimate value it deserves.
Wishing you all a safe, successful and enjoyable season!