 Nebraskaland Magazine
Photos and story by Chris Helzer
Have you ever wanted to take better photos of insects? Of course you have; insect photography tops every self-respecting outdoor enthusiast’s list of aspirations. It’s hard to hold your head high among your peers when they’re showing off spectacular photos of leafhoppers and damselflies and all you have is a blurry shot of something that might have been a bee.
Worry no more, my friend. Here are 10 tips that will make you a better insect photographer. Many of these tips will also apply to other kinds of close-up (aka macro) photography, so if you can successfully photograph insects, you’ll find that photographing flowers, tree bark, or your favorite Lego Minifigure will feel like child’s play. By the way, I may refer to spiders and other non-insects in this article, and yes, I know they’re not insects. It’s just a lot simpler to write “insects” than it is to write “arthropods” or “invertebrates.” Don’t be pedantic.
Tip #1. Be Prepared for Failure
Here’s the hard reality: most insects aren’t going to let you take their picture. Just when you’ve crept nearly close enough to get a smashing photo of a cute soldier beetle on a flower, the little bugger will almost always jump or fly away.
Alternatively, you’ll knock the beetle off its perch yourself, with your big clumsy feet or elbows. You’re going to get really frustrated. You’ll find yourself on your hands and knees yelling bad words at a ladybug who won’t stand still for just a second.
If you can’t handle that degree of exasperation, you might as well stop reading right now and go find something easier to do – like putting together jigsaw puzzles with no pictures.
Tip #2. Approach Low and Slow
Stalking insects is much like stalking any other prey. Approach your quarry slowly and avoid making sudden moves that might draw attention to yourself. Try not to bump or step on plant stems that could hit the stem your subject is on. Be aware of your shadow and make sure it doesn’t pass over the insect as you’re creeping toward it. Most importantly, keep your head down.
Like many other creatures, insects will most easily spot you when you obstruct their view of the sky. Stay low enough that your head is below the insect’s view of the horizon and you’ll have a decent chance of getting close enough for a photograph.
Tip #3. Camera Equipment
Before you go out, let’s talk about the kind of camera equipment you’ll need. There are a few important things to consider when you’re shopping for insect photography gear.
You don’t need to buy a camera that costs more than your car. All you need is something that lets you manually control exposure (shutter speed and aperture), allows interchangeable lenses, can attach to a tripod, and lets you remotely trigger the shutter, when necessary. Because you’ll be working with very little depth-of-field, you’ll need to manipulate the camera’s aperture (more on that later) and often shoot with relatively slow shutter speeds. A basic digital single lens reflex (DSLR) camera is probably your best option.
A macro lens is really important. There are cheaper options, including some magnifying lenses that screw onto your lens like a filter, but if you’re going to be serious about insect photography, start with equipment that won’t limit you. A good lens may cost you several hundred dollars, but you’ll be glad to have it. Look for a macro lens capable of a 1:1 magnification ratio, which means the projected image of a bee onto your camera’s sensor will be the same size as the bee is in real life.
Some photographers like to use flash equipment for close-up photos of insects. I own a flash system, but rarely use it. However, if you plan to photograph insects in woodland or other shady places, or if you will be taking lots of photos of fast-moving insects like bees, flash can be really helpful. Look for flash systems that direct light at the subject from more than one direction simultaneously, using either a ring flash or multiple flash units. Also, try to use flash as supplementary light, rather than at an intensity that illuminates the subject so brightly the background turns black.
Tip #4. Use a Tripod
Tripods can be unwieldy, especially when you’re trying to photograph something close to the ground in dense vegetation. However, the added stability of a tripod has enough advantages to outweigh the hassles most of the time. When trying to maximize depth-of-field, you’ll often need slow shutter speeds, and that can make it hard to hold a camera steady enough to avoid blurry images. A tripod can solve that, especially when you control the shutter remotely, either with a cord or a radio-controlled trigger.
In addition, however, a tripod can minimize the number of factors you are trying to deal with when taking insect photos. With a shallow depth-of-field, a camera movement of just a millimeter toward or away from the insect can cause it to go out of focus. A tripod helps reduce movement of your camera so all you have to worry about is the wind and the movements of the insect, which is plenty. Sometimes, when an insect is moving quite a bit, or the wind is blowing its perch around, I’ll fold my tripod legs together and use it as a monopod. That way I can move with the insect, but still control camera shake and give myself a reasonable chance of getting that little stink bug in focus.
Tip #5. Make Your Camera Squint
Maximizing depth-of-field in macro photos means using small apertures (higher F-stop numbers). The effect is like squinting at the alarm clock without your glasses or contacts, or to just see something more clearly. When photographing insects, a larger f-stop number means more of the insect will be in focus (large f-stop number equals a small hole for light to pass through). The trade-off, of course, is the need for slower shutter speeds. Even with a tripod, there will be many times when an insect is moving enough that a shutter speed of 1/30 second or faster will be needed to freeze the action. Faster shutter speeds limit how much your camera can squint, especially in low light situations, so balancing aperture with shutter speed is always in the mind of an insect photographer.
Tip #6. Perpendicularity is Good
One way to limit frustration with depth-of-field is to position yourself so the insect is as perpendicular as possible to the camera. The flatter you can make the subject, the more of it will be in focus. Depending upon the situation, it’s not always possible to control the angle from which you photograph, but sometimes just moving yourself a few inches one way or the other can make a big difference. If you can, think about the angle you want before you approach the insect. That will limit how much fiddling around you’ll need to do when you’re within shooting range, and will increase the chance of getting a photo before that butterfly flees the scene.
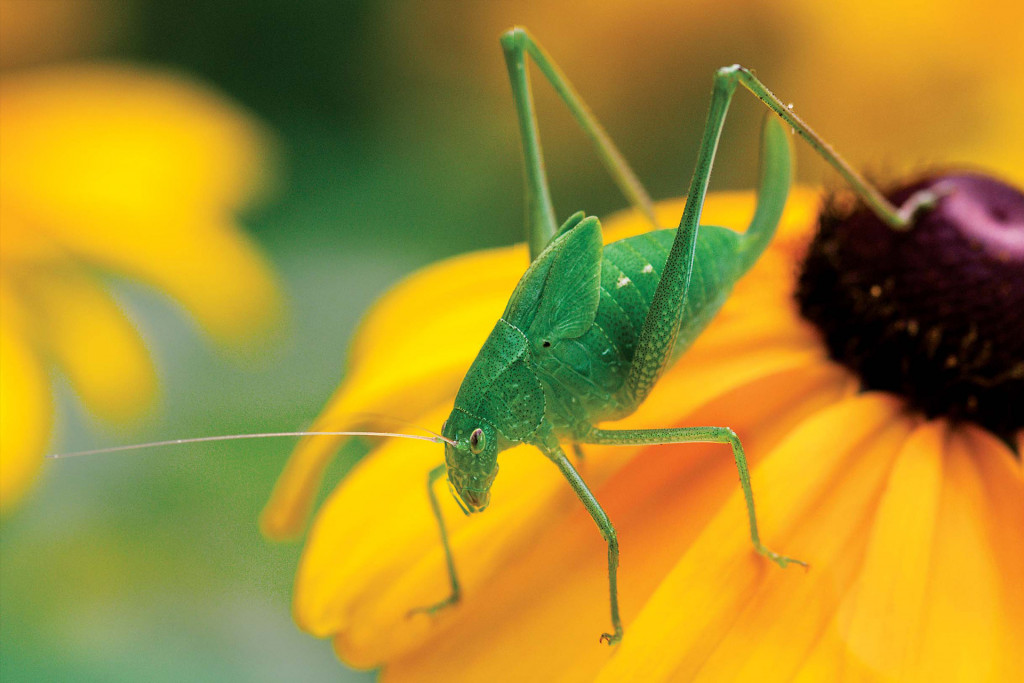
Tip #7. Aim for the Eye
When we look at other people our eye is automatically drawn to their eye(s). The same is true with insects, even if their eyes might look different (or be more numerous) than our own. If you can see the eye of the insect you’re photographing, make sure it is in focus when you take the picture. Even if the majority of the insect is out of focus, get the eye sharp and the photo will likely work. Only on rare occasions is there a more appropriate focal point than the eye. In addition, although depth-of-field issues can make it tricky, don’t be afraid to try for intimate face-to-face images of insects. If you don’t scare the insect away (and you probably will) you might get a truly great photo.
Tip #8. Pay Attention to the Background
When trying to keep track of focal point and depth of field while cursing softly under your breath at the wind and the spider that keeps shifting position, it can be easy to forget about what’s behind your subject. Unfortunately, the background of an image can easily ruin a photograph, even if you get everything else right. A nice clean background, free of distracting blurry stems or leaves, can create simple, elegant images that highlight the insect itself. On the other hand, sometimes it’s nice to include a background that shows the insect in its actual environment, creating a less studio-like photograph. In either case, the key is to make sure you’re making conscious choices about how you want the background to look. If your camera has a “depth-of-field preview” button, use it to check out the background before you shoot.
There are several ways to control the background in a close-up photo. The first is depth-of-field. A shallow depth-of-field will blur out everything behind the subject, creating a nice, simple image. However, because there are good reasons to maximize depth-of-field to ensure a sufficient amount of the insect will be in focus, this can create a tension. Again, there is no rule to follow here; just be thoughtful about the choices available to you, and if there’s time, experiment with both shallow and deeper depth-of-field options.
Background can also be controlled by your relative position to the subject. You can get down lower than the insect and frame it against a clean sky, for example, with or without a horizon line included. Sometimes, by moving slightly to one side or another, you can eliminate a pesky shadow or stray leaf that is creating a distraction behind the subject. In some situations, you can hold up your hand or hat to create a shadow behind the insect and prevent overly bright reflections from light-colored stems or leaves. Be very careful with this last strategy, of course, since both movement and shadows can easily spook your insect before you get the photo you want.
Finally, you can control background by physically moving objects around to get them out of the way of the shot. I do this all the time, but there are ethical boundaries to consider. It’s one thing to bend a grass leaf out of the way and tuck it behind another plant. It’s another thing to tear plants out by the roots because they’re in your shot. Remember that as a nature photographer, you’re there to capture the scene, not destroy it. Plus, by the time you mess around with moving distracting plants out of the way, your insect will have flown off long ago.
Tip #9. Take a Lot of Shots. Seriously.
One of the greatest advantages of digital photography is that, unlike with film photography, clicking the shutter button costs you nothing but time to sort through the resulting images. In the case of insect photography, this is a huge blessing. Between wind, moving insects, depth-of-field issues, messy backgrounds, and all the other complications you’re dealing with, getting everything right in the same shot is really difficult. It’s not unusual for me to take 100 photos of the same insect (assuming it sits still long enough to do that). Within those 100 photos, I’m trying different angles and composition options, creeping gradually closer to the insect, and experimenting with depth-of-field and shutter speed. Above all, I’m hoping that at least one of the images will come back with the insect’s eye in sharp focus, especially when that insect isn’t sitting perfectly still. Take way more photos than you think you’ll need; you’ll thank me.
Tip #10. Go Out When the Light is Good
In insect photography, as with any photography, light is the most important element. Getting good insect photos in the middle of a bright sunny day is almost impossible without using diffusers, flash, or other tricks to reduce the harshness of the bright light and contrasting dark shadows – and those tricks just add to the complexity of an already difficult task. Your camera’s sensor can’t handle the same range of light your eye can, so you’ll either get washed out highlights or black shadows, and either way, the resulting image will likely be disappointing. More importantly, photographs taken when the quality of light is high will result in more colorful and attractive images. The sun looks nearly white in mid-day, but is colorful during the early morning and late evening. That colorful light reflects from whatever it hits, making your insect and its background more attractive. In addition, reduced light intensity on bright, overcast days or during the early or late portions of the day eliminates distracting shadows and lets every nook and crevice of the insect shine through in your image. Journalism photographers have to shoot when the action is happening and do what they can with the light they get, but the rest of us have more control over when we go out. When you can, search for insects when the light is good; you’ll get better quality photos. Of course, this assumes any insects sit still long enough to be photographed.
BONUS TIP. Dewy Mornings!
Despite all the complications nature throws at insect photographers, there is one blessing bestowed upon insect photographers that makes up for everything: dewy mornings. Especially in the late summer, nature creates magical opportunities when a low morning sun angle provides soft golden light and the world is covered by glistening jewels of water droplets. Not only do dew drops create interesting and attractive subject matter, the cool temperatures and moisture also prevent insects from moving (much) until they warm up and dry out. It’s hard to imagine a better overall scenario for insect photographers, so if you wake up and see dew drops on still leaves outside, clear your schedule and go find some insects!
Last Thoughts
Some hunters and anglers say their satisfaction comes not from shooting a deer or catching fish, but from the pursuit, and the stories they can tell later. Regardless, it’s true that chasing deer, pheasants or fish makes you look at the world differently, and brings a different kind of enjoyment than just walking aimlessly down a trail. The same is true of insect photography. Despite the fact that most insects will escape before you capture their image (did I mention that?) you’ll find that just the bare attempt to find and photograph insects and other little creatures will open your eyes to a world you’d otherwise ignore.
As you develop a mental search image for insects, you’ll start seeing them everywhere – and not in a creepy way. Once you begin watching those insects closely, you’ll see behaviors and interactions that will stimulate your curiosity and sense of wonder. You’ll find a diversity of life you never imagined, and find yourself digging through books and internet sites trying to figure out what kind of moth has that cool wavy stripe across its wings. If you’re lucky and persistent, you might even get some nice, sharp photographs of insects. ■
